


TL;DR
- To improve the resolution of a photo, first identify whether the problem is too few pixels, missed focus, motion blur, noise, or compression. These need different fixes.
- If the photo is sharp but too small for its intended placement, use the largest original and test an AI image upscaler.
- If important details are already blurred or unreadable, upscaling can create plausible detail but cannot verify the original detail.
- For print, calculate required pixels from the physical size and the printer's PPI requirement; changing the PPI label alone adds no pixels.
- Judge the output at its final viewing size and at 100% zoom, especially around faces and text.
The first step in learning how to improve resolution of a photo is diagnosing why it looks poor. A cropped portrait may be sharp but simply too small. An old scan may have enough pixels but visible noise. A motion-blurred phone shot may be large already. Sending all three through an upscaler is unlikely to give the same result.
This guide is for photographs: portraits, travel pictures, archived scans, and product shots. For the general distinction between pixel dimensions and print PPI, start with our image-resolution guide.
Diagnose the photo in four checks
Open the best version you have, zoom to 100%, and inspect an important subject area. Then identify the main defect.
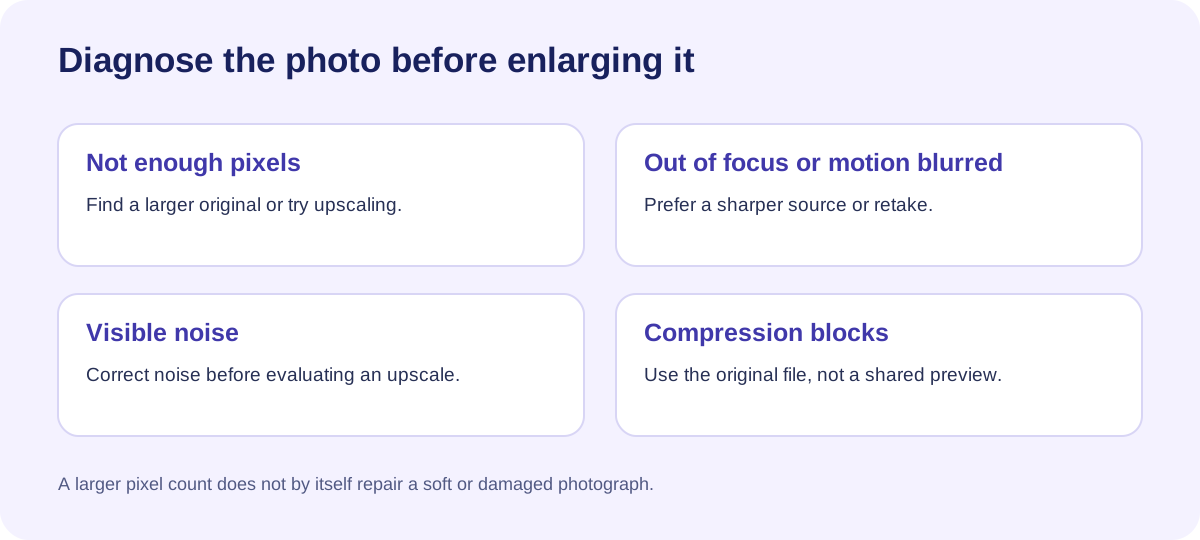
| What you see | Likely problem | Better first move |
|---|---|---|
| Clean details, but the photo is too small for the placement | Insufficient pixel dimensions | Find the full-size original; upscale if necessary. |
| Soft eyes, signs, or product labels even at the original size | Missed focus or motion blur | Find another frame, rescan, or reshoot if possible. |
| Speckles in shadows or flat areas | Image noise | Correct noise cautiously, then decide whether more pixels are needed. |
| Square blocks or ringing around edges | Compression | Locate the original file rather than a shared or downloaded preview. |
One photo can have more than one defect. Fix the source problem before you enlarge it; otherwise the larger output may make defects easier to see. Adobe's guide to image size and resampling notes that adding pixels cannot add detail absent from the original.
Work backward from where the photo will appear
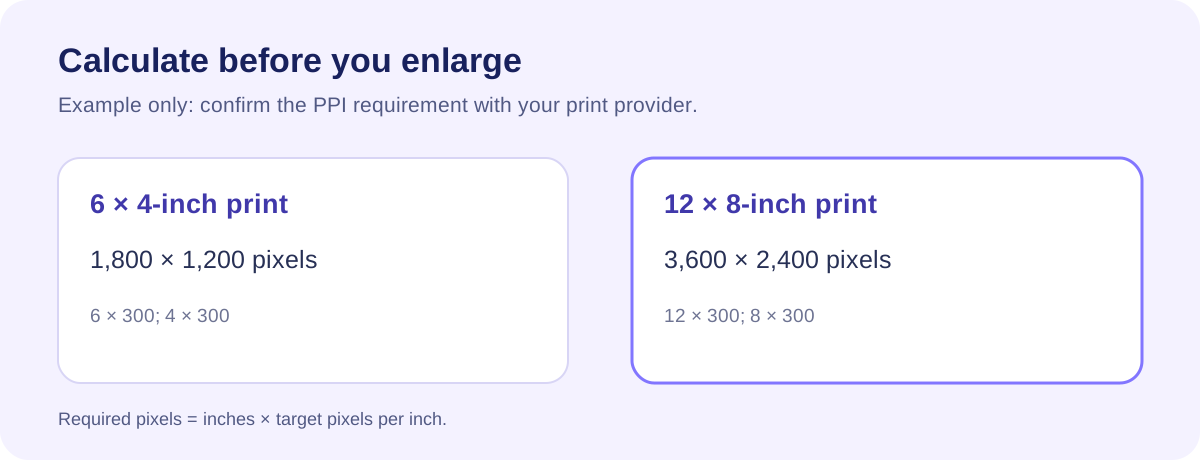
For a website, social post, or presentation, measure the required pixel width and height. A 1,200-pixel-wide slot does not need a 16K file simply because the option exists. For a print, ask the print provider for the finished inches and recommended PPI.
As a calculation example, a 6 × 4-inch print at 300 PPI needs 1,800 × 1,200 pixels. A 12 × 8-inch print at the same PPI needs 3,600 × 2,400 pixels. Those numbers are arithmetic, not a promise that every printer or viewing distance requires 300 PPI. Adobe explains how print dimensions, PPI, and pixels relate.
If your original already meets the required pixels, you may only need the correct crop or print setting. If it falls short, decide whether the original is clean enough to upscale.
A practical workflow for a resolution-limited photo
1. Find the best source
Look for the original camera file, full-size export, or highest-quality scan. Avoid messaging-app previews and screenshots of the photo. For a physical photograph, a new scan may provide a better starting point than enlarging an old low-resolution scan.
2. Preserve the original and make a working copy
Keep the original unchanged. Record its pixel dimensions and the size you need. This gives you a fair before-and-after comparison and prevents repeated export from becoming your new “source.”
3. Test an appropriate target
If the photo is reasonably sharp but undersized, open UGC Maker's AI Image Upscaler. The current interface accepts PNG, JPG, JPEG, and WebP up to 16 MB per image and shows 2K, 4K, 8K, and 16K target choices. Choose the smallest target that meets the placement, upload the working copy, and generate a result. Verify the exported dimensions; the on-screen preset labels are not a substitute for checking your file.
If you only need a modest change, a standard resampling method may be enough. Adobe lists Photoshop's enlargement options, including Preserve Details 2.0 and Bicubic Smoother. Try one method at a time from the original, not from an already enlarged export.
4. Compare the details that matter
View source and output at equivalent crops. At 100% zoom, check eyes, hair, teeth, fine clothing patterns, straight architectural lines, and any writing. At the final display or print size, ask whether the photo actually looks better. A technically larger file can still look artificial.
If the image shows people, do not treat AI-created facial detail as evidence of how they really looked. If it shows a product, confirm that labels, colors, logos, and packaging remain faithful to the original. For a deeper inspection checklist, read how to upscale without losing quality.
When upscaling is the wrong fix
Missed focus: Enlarging a soft face does not recreate a sharp original. Find another shot or use a restoration workflow, then review it carefully.
Motion blur: A larger canvas does not undo movement recorded during exposure. A different frame is usually more dependable.
Heavy compression: Seek the original file. Upscaling a heavily compressed copy can strengthen the unwanted blocks and edge halos.
Tiny text or identifying details: An AI model may produce readable-looking characters or features that were never present. Do not use that output to verify a name, a number, or a person's identity.
Private family or client photos: Before uploading sensitive material to any online tool, check the service's current privacy terms and your permission to use that image. A local workflow may be preferable when the file must stay on your device.
FAQ
Can AI improve an old photo's resolution?
It can increase pixel dimensions and may improve how a reasonably clear scan looks at a larger size. It cannot guarantee reconstruction of original details that the scan or photograph never recorded. Start with a better scan when possible.
Will increasing a photo from 72 PPI to 300 PPI make it sharper?
Only if pixels are also added through resampling or upscaling—and even then, sharpness is not guaranteed. With resampling off, changing PPI alone changes the physical print size of the same pixels.
What is the best way to improve a blurry photo?
First decide whether the blur comes from too few pixels, camera motion, or missed focus. Upscaling is mainly a size solution. A sharper source, a new scan, or a retake is more reliable for missing focus and motion detail.
Final takeaway
Improving photo resolution starts with a diagnosis: use upscaling when a reasonably clean photo needs more pixels, and fix or replace a damaged source when the detail itself is missing. If your photo is sharp but too small, test the required size in the AI Image Upscaler. The UGC Maker homepage lists other creative tools when resizing is only one step in your workflow.